
| No page 8:65a only summary |
Content |
|
No page 8:65a only summary Page 8:65 Wheels and tires Page 8:66 Wheels and tires Page 8:67 Wheels and tires Page 8:68 Wheel changing Page 8:69 Wheel changing |
| Page 8:65 Wheels and tires |
Checking and correcting tire pressureCheck the tire pressure when refueling.The tire pressure should only be corrected when the tires are cold. With warm tires, correct only when the pressure is too low. The tire temperature rises after driving just a few miles. Tire pressure, cold tyres, in psi (kPa)
See Consumer onformation Booklet for complete tire pressure in- formation. Space Saver spare tire max speed 50 mph. |
Wear indicatorThe tires have a so-called "wear indicator" in the form of a number ofnarrow strips running across or parallel to the tread. When approx. 1/16" = 1,5 mm is left on the tread, these strips show up and indicate the tire should be replaced. Tires with less than 1/16" tread have a poor grip in rain or snow. How to improve tire economy | ||||||||||||||||||||||||||||||||||||||||||||||
| Examples of tire wear |
| Underinflated |
Overinflated |
Wrong toe-in |
Unbalance |
Wear indicator exposed. Tire is worn, replace. |
| Page 8:66 Wheels and tires |
Winter SeasonRadial snow tires are recommended for winter driving.Tire chains can be used on the rear wheels if the chains do not project too far from the tire and chafe against the brake caliper or other components. Strap-on emergency chains must not be used since the space between the brake caliper and the wheel rim is inadequate |
|
| Page 8:67 Wheels and tires |
Spare tireTo save trunk space, the car has been equipped with a space saverspare tire. The tire is intended for temporary use only and is stored deflated. To fill with air, there is a special air compressor which may be connected to the cigarette lighter receptacle. When used the spare tire should be inflated to 36 psi. The air valves include a safety valve which protects the tire from over- inflation. Tire and rim comprise a unit which should be separated. Replace as a unit at a Volvo dealership in case the spare tire is dam- aged. Note! The tire should be used only in place of a deflated (flat) tire and is in- tended only for driving to a repair shop where damaged tire can be repaired or replaced. Maximum speed is 50 mph=80 kph. Keep in mind that because of its simple design the tire tread pattern does not provide optimum driveability. Air compressorThe air compressor has no swith and will start when connected to thecigarette lighter receptacle. If it does not start when plugged in, check fuse No. 1 first and then the tobacco residue in the receptacle. Do not use the air compressor for periods longer than 20 minutes as it will overheat. Allow cooldown between periods. Do not inflate the spare tire to pressures higher than 36 psi. |
 Installing spare tire1. Lift the car and remove the defective wheel2. Install the space saver spare tire. 3. Connect the air compressor hose to the tire valve. 4. Route the electrical cable through the side window to avoid dam- age to the cable and plug it into the cigarette lighter receptacle. 5. Inflate to 36 psi (in middle of gauge between graduation 2 and 3). Disconnect the air compressor and install the wheel nuts alternately. 6. Lower the car and retighten the wheel nuts alternately. Drive to the nearest repair shop and have the spare tire replaced by the repaired or replaced original. Deflate the spare tire. |
| Page 8:68 Wheel changing |
| To observe when replacing wheels To avoid re-balancing, mark and re-install wheels in same location and same position as before removeal. |
 |
|
Changing a wheel |
Removal |
|
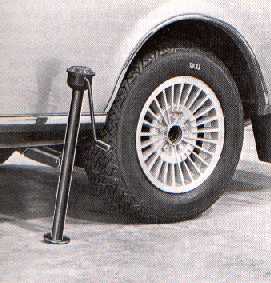
| Spare wheel, jack and tool kit are stowed in the trunk compartment. Before raising the car with the jack be sure it is on firm and level ground. NOTE! Do not crawl or work under the car while it is raised by the jack. Before the car is raised with the jack the parking brake should be applied and first or reverse gear engaged. With automatic trans- mission, the selector should be in Park. Block one of the wheels on the opposite side of the car from the jack. |
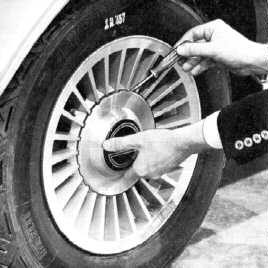
The wheel cap can be removed with the tommy bar or the screwdriver provided in the tool kit. |
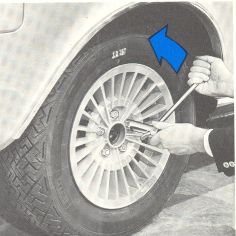
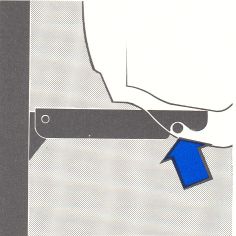
Loosen the wheel nuts ½-1 turn with the box wrench provided in the tool kit. All of the wheel nuts have right-hand threads which are loosened by turning them counter- clockwise. |
| Page 8:69 Wheel changing |
 |
 |
|
| Insert the lifting arm of the jack attachment closest to the wheel to be changed. |
Be sure the arm goes al the way into the attachment. Raise up the side of the car enough to lift the wheel off the ground. Unscrew the wheel nuts completely and remove the wheel carefully so as not to damage the treads of the studs. |
Installationand hub. on the hub shoulder. good contact with the flenge nately to 72 - 100 ft.lbs. (100 - 130 Nm) NOTE: Do not rotate a raised rear wheel if the car is equipped with a limited slip differential. This will also move the opposite wheel on the ground and the car may slide off the jack. |
![]()